#. Before started
#. Make an empty project
You can start with a project with navigation drawer too, but only in that case you won’t have to follow all this tutorial.
a. Add a dependency
add a dependency of materials and anko library on app level ‘build.gradle’.
dependencies {

    ...

    implementation 'com.google.android.material:material:1.0.0'
    implementation "org.jetbrains.anko:anko:0.10.4"  //anko library
}
b. Add 4 layouts
For navigation drawer, we will need
- menu of navigation drawer
- header of navigation drawer
- background layout
- layout with the 2nd and 3rd layout
It might be little confusing now, but you will see how I meant those layouts.
b.1. So first layout would be named as “activity_main_menu.xml”.

Remember to add as Menu resource type. If you add it, Here is the code for it. So this is the menu which you will put in the navigation drawer view.
<?xml version="1.0" encoding="utf-8"?>
<menu xmlns:android="http://schemas.android.com/apk/res/android"
xmlns:tools="http://schemas.android.com/tools"
tools:showIn="navigation_view">

<group android:checkableBehavior="single">
    <item
        android:id="@+id/nav_home"
        android:icon="@drawable/abc_vector_test"
        android:title="menu_home" />
    <item
        android:id="@+id/nav_gallery"
        android:icon="@drawable/abc_vector_test"
        android:title="menu_gallery" />
    <item
        android:id="@+id/nav_slideshow"
        android:icon="@drawable/abc_vector_test"
        android:title="menu_slideshow" />
</group>
</menu>
b.2. Second layout will be named as “navigation_header_main.xml”
This file is layout resource type. This will be the header part of your navigation drawer. code is as following;
<?xml version="1.0" encoding="utf-8"?>
<LinearLayout xmlns:android="http://schemas.android.com/apk/res/android"
    xmlns:app="http://schemas.android.com/apk/res-auto"
    android:layout_width="match_parent"
    android:layout_height="200dp"
    android:background="#3F51B5"
    android:gravity="bottom"
    android:orientation="vertical"
    android:paddingLeft="15dp"
    android:paddingBottom="15dp">

    <ImageView
        android:id="@+id/imageView"
        android:layout_width="100dp"
        android:layout_height="100dp"
        android:layout_marginBottom="10dp"
        android:scaleType="fitCenter"
        app:srcCompat="@mipmap/ic_launcher_round" />


    <TextView
        android:layout_width="match_parent"
        android:layout_height="wrap_content"
        android:text="PICK8CHU"
        android:textColor="#FFFFFF"
        android:textStyle="bold" />

    <TextView
        android:layout_width="wrap_content"
        android:layout_height="wrap_content"
        android:text="Tutorial for Navigation drawer"
        android:textColor="#FFFFFF" />

</LinearLayout>
b.3. Now, background layout.
Add another layout resource file, name it as “content_main.xml”.
<?xml version="1.0" encoding="utf-8"?>
<LinearLayout xmlns:android="http://schemas.android.com/apk/res/android"
    xmlns:app="http://schemas.android.com/apk/res-auto"
    xmlns:tools="http://schemas.android.com/tools"
    android:orientation="vertical"
    android:layout_width="match_parent"
    android:layout_height="match_parent">

    <com.google.android.material.appbar.AppBarLayout
        android:layout_height="wrap_content"
        android:layout_width="match_parent"
        android:theme="@style/ThemeOverlay.AppCompat.Dark.ActionBar">

        <androidx.appcompat.widget.Toolbar
            android:id="@+id/toolbar"
            android:layout_width="match_parent"
            android:layout_height="?attr/actionBarSize"
            android:background="?attr/colorPrimary"
            app:popupTheme="@style/ThemeOverlay.AppCompat.Light">
            <LinearLayout
                android:layout_width="match_parent"
                android:layout_height="match_parent"
                android:orientation="horizontal"
                android:gravity="center_vertical">
                <TextView
                    android:layout_width="wrap_content"
                    android:layout_height="wrap_content"
                    android:text="tool bar"
                    android:textColor="#FFFFFF"
                    style="@style/TextAppearance.AppCompat.Widget.ActionBar.Title"/>
            </LinearLayout>
        </androidx.appcompat.widget.Toolbar>

    </com.google.android.material.appbar.AppBarLayout>


    <androidx.constraintlayout.widget.ConstraintLayout
        android:layout_width="match_parent"
        android:layout_height="match_parent">

        <Button
            android:id="@+id/buttonAdd"
            android:layout_width="88dp"
            android:layout_height="48dp"
            android:text="add"
            app:layout_constraintBottom_toBottomOf="parent"
            app:layout_constraintEnd_toEndOf="parent"
            app:layout_constraintStart_toEndOf="@+id/menuEditText"
            app:layout_constraintTop_toTopOf="parent" />

        <EditText
            android:id="@+id/menuEditText"
            android:layout_width="wrap_content"
            android:layout_height="wrap_content"
            android:ems="10"
            android:inputType="textPersonName"
            android:text="Menu Name"
            app:layout_constraintBottom_toBottomOf="parent"
            app:layout_constraintEnd_toStartOf="@+id/buttonAdd"
            app:layout_constraintStart_toStartOf="parent"
            app:layout_constraintTop_toTopOf="parent" />
    </androidx.constraintlayout.widget.ConstraintLayout>

</LinearLayout>
b.4. Finally, the layout containing all above!
We will use “activity_main.xml” which was made when we first made the empty project. Here is the code:
<?xml version="1.0" encoding="utf-8"?>
<androidx.drawerlayout.widget.DrawerLayout xmlns:android="http://schemas.android.com/apk/res/android"
    xmlns:app="http://schemas.android.com/apk/res-auto"
    xmlns:tools="http://schemas.android.com/tools"
    android:id="@+id/drawer_layout"
    android:layout_width="match_parent"
    android:layout_height="match_parent"
    android:fitsSystemWindows="true"
    tools:openDrawer="start">

    <include
        layout="@layout/content_main"
        android:layout_width="match_parent"
        android:layout_height="match_parent" />

    <com.google.android.material.navigation.NavigationView
        android:id="@+id/nav_view"
        android:layout_width="wrap_content"
        android:layout_height="match_parent"
        android:layout_gravity="start"
        android:fitsSystemWindows="true"
        app:headerLayout="@layout/navigation_header_main"
        app:menu="@menu/activity_main_menu" />

</androidx.drawerlayout.widget.DrawerLayout>
c. Lastly, change the default setting
When you first make empty projects, android studio automatically sets default tool bar(action bar) and title bar. We have to remove those for our own action bar to work. Also, we will change the status bar color when the navigation drawer is on.
<resources>

    <!-- Base application theme. -->
    <style name="AppTheme" parent="Theme.AppCompat.Light.DarkActionBar">
        <!-- Customize your theme here. -->
        <item name="colorPrimary">@color/colorPrimary</item>
        <item name="colorPrimaryDark">@color/colorPrimaryDark</item>
        <item name="colorAccent">@color/colorAccent</item>

        <!-- remove a default action bar -->
        <item name="windowActionBar">false</item>
        <!-- remove a default title bar -->
        <item name="windowNoTitle">true</item>
        <!-- make status bar transparent when navigation bar is on -->
        <item name="android:statusBarColor">@android:color/transparent</item>
    </style>

</resources>
1. Fix MainActivity.kt
It’s quite straight forward from here, here is the code. In ‘onNavigationItemSelected’ function, you could add your own listener for item menus.
import androidx.appcompat.app.AppCompatActivity
import android.os.Bundle
import android.view.MenuItem
import androidx.appcompat.app.ActionBarDrawerToggle
import androidx.appcompat.widget.Toolbar
import androidx.core.view.GravityCompat
import androidx.drawerlayout.widget.DrawerLayout
import com.google.android.material.navigation.NavigationView
import org.jetbrains.anko.toast

class MainActivity : AppCompatActivity(), NavigationView.OnNavigationItemSelectedListener {

    lateinit var toolbar: Toolbar
    lateinit var drawerLayout: DrawerLayout
    lateinit var navView: NavigationView
    override fun onCreate(savedInstanceState: Bundle?) {
        super.onCreate(savedInstanceState)
        setContentView(R.layout.activity_main)

        toolbar = findViewById(R.id.toolbar)
        // Set a Toolbar to act as the ActionBar for this Activity window
        setSupportActionBar(toolbar)

        drawerLayout = findViewById(R.id.drawer_layout)
        navView = findViewById(R.id.nav_view)

        // ActionBarDrawerToggle provides a handy way to tie together
        // the functionality of DrawerLayout and the framework ActionBar
        // to implement the recommended design for navigation drawers.
        val toggle = ActionBarDrawerToggle(
            this, drawerLayout, toolbar, 0, 0
        )
        // Make drawer layout to listen the ActionBarDrawerToggle class
        drawerLayout.addDrawerListener(toggle)

        // Call syncState() from your Activity's onPostCreate
        // to synchronize the indicator with the state of
        // the linked DrawerLayout after onRestoreInstanceState has occurred.
        toggle.syncState()
        navView.setNavigationItemSelectedListener(this)
    }

    override fun onNavigationItemSelected(item: MenuItem): Boolean {
        when (item.itemId) {
            R.id.nav_home -> {
                toast("nav_home menu item is selected")
            }
            R.id.nav_gallery -> {
                toast("nav_gallery menu item is selected")
            }
            R.id.nav_slideshow -> {
                toast("nav_slideshow menu item is selected")
            }
        }
        drawerLayout.closeDrawer(GravityCompat.START)
        return true
    }
}
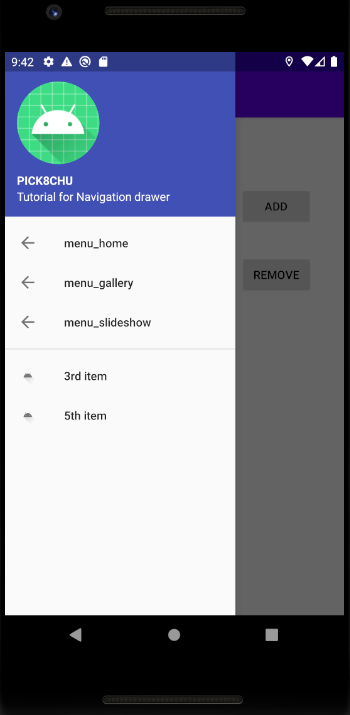
Now, if you start your app, you will see an app like this;
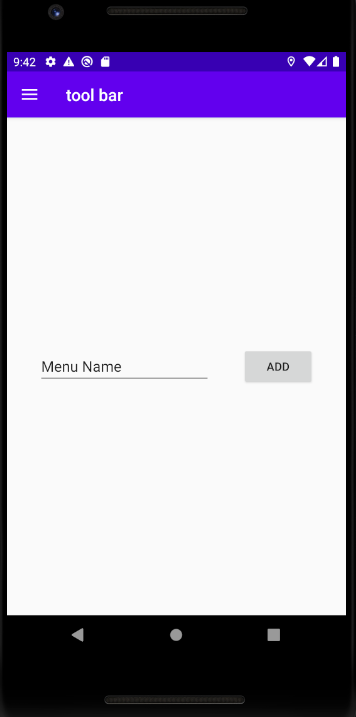
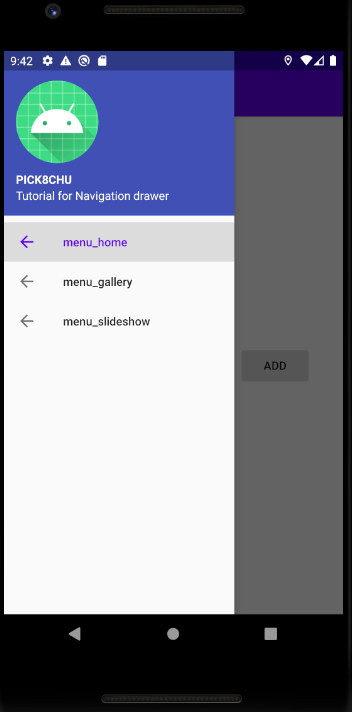
Try to click those menu items to make sure ‘onNavigationItemSelected’ function works.
2. Dynamically add/remove menu item
So all the basics are done, and now we will try to edit menu item dynamically at runtime.
a. add a menu item
To add or delete menu item, you will use this function.
public MenuItem add(int groupId, int itemId, int order, CharSequence title);
Note what parameters it needs. Here is the implemented code.
override fun onCreate(savedInstanceState: Bundle?) {

    ...

    buttonAdd.setOnClickListener {
        var mMenu = navView.menu
        var menuSize = mMenu.size()
        // groupId, itemId, order, title
        mMenu.add(1, menuSize, menuSize, menuEditText.text.toString())
        // parameter of getItem is
        mMenu.getItem(menuSize).setIcon(R.drawable.ic_launcher_foreground)

        drawerLayout.openDrawer(Gravity.LEFT)
        longToast(menuEditText.text.toString() + "is added on the "+ menuSize +"th order")
    }
}
The itemId will be used to get the specific item. This will add a new menu item named as ‘menuEditText.text’ on the end of the menu.
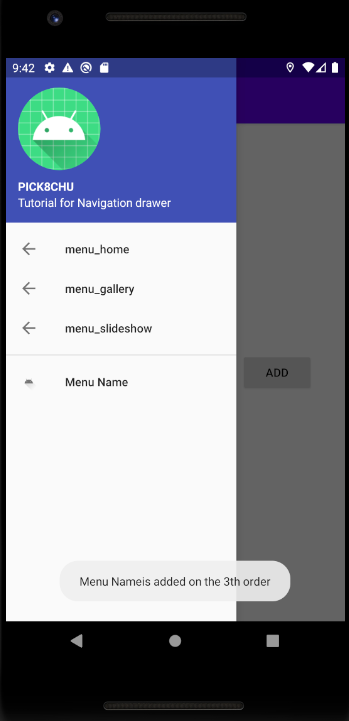
Remember the order starts from 0. The line between existing menu and new menu is created since the menu groups are different.
b. remove a menu item
Before we do this, let’s add another button so we could remove a menu item. Change “content_main.xml” with following code;
<?xml version="1.0" encoding="utf-8"?>
<LinearLayout xmlns:android="http://schemas.android.com/apk/res/android"
    xmlns:app="http://schemas.android.com/apk/res-auto"
    xmlns:tools="http://schemas.android.com/tools"
    android:orientation="vertical"
    android:layout_width="match_parent"
    android:layout_height="match_parent">

    <com.google.android.material.appbar.AppBarLayout
        android:layout_height="wrap_content"
        android:layout_width="match_parent"
        android:theme="@style/ThemeOverlay.AppCompat.Dark.ActionBar">

        <androidx.appcompat.widget.Toolbar
            android:id="@+id/toolbar"
            android:layout_width="match_parent"
            android:layout_height="?attr/actionBarSize"
            android:background="?attr/colorPrimary"
            app:popupTheme="@style/ThemeOverlay.AppCompat.Light">
            <LinearLayout
                android:layout_width="match_parent"
                android:layout_height="match_parent"
                android:orientation="horizontal"
                android:gravity="center_vertical">
                <TextView
                    android:layout_width="wrap_content"
                    android:layout_height="wrap_content"
                    android:text="tool bar"
                    android:textColor="#FFFFFF"
                    style="@style/TextAppearance.AppCompat.Widget.ActionBar.Title"/>
            </LinearLayout>
        </androidx.appcompat.widget.Toolbar>

    </com.google.android.material.appbar.AppBarLayout>


    <androidx.constraintlayout.widget.ConstraintLayout
        android:layout_width="match_parent"
        android:layout_height="match_parent">

        <EditText
            android:id="@+id/menuEditText"
            android:layout_width="wrap_content"
            android:layout_height="wrap_content"
            android:ems="10"
            android:inputType="textPersonName"
            android:text="Menu Name"
            app:layout_constraintBottom_toBottomOf="parent"
            app:layout_constraintEnd_toStartOf="@+id/buttonAdd"
            app:layout_constraintStart_toStartOf="parent"
            app:layout_constraintTop_toTopOf="parent"
            app:layout_constraintVertical_bias="0.15" />

        <Button
            android:id="@+id/buttonAdd"
            android:layout_width="88dp"
            android:layout_height="48dp"
            android:text="add"
            app:layout_constraintBottom_toBottomOf="parent"
            app:layout_constraintEnd_toEndOf="parent"
            app:layout_constraintStart_toEndOf="@+id/menuEditText"
            app:layout_constraintTop_toTopOf="parent"
            app:layout_constraintVertical_bias="0.15" />

        <EditText
            android:id="@+id/menuIdText"
            android:layout_width="wrap_content"
            android:layout_height="wrap_content"
            android:ems="10"
            android:hint="Menu Item ID"
            android:inputType="textPersonName"
            app:layout_constraintBottom_toBottomOf="parent"
            app:layout_constraintEnd_toStartOf="@+id/buttonAdd"
            app:layout_constraintStart_toStartOf="parent"
            app:layout_constraintTop_toTopOf="parent"
            app:layout_constraintVertical_bias="0.30" />

        <Button
            android:id="@+id/buttonRemove"
            android:layout_width="88dp"
            android:layout_height="48dp"
            android:text="remove"
            app:layout_constraintBottom_toBottomOf="parent"
            app:layout_constraintEnd_toEndOf="parent"
            app:layout_constraintStart_toEndOf="@+id/menuEditText"
            app:layout_constraintTop_toTopOf="parent"
            app:layout_constraintVertical_bias="0.3" />
    </androidx.constraintlayout.widget.ConstraintLayout>

</LinearLayout>
We will use removeItem function. ‘id’ here stands for ‘itemId’ what we used when we added a menu item.
public void removeItem(int id);
Now, we will add a button on click listener for the remove button.
override fun onCreate(savedInstanceState: Bundle?) {

	...

    buttonRemove.setOnClickListener {
        var mMenu = navView.menu
        mMenu.removeItem(menuIdText.text.toString().toInt())

        drawerLayout.openDrawer(Gravity.LEFT)
        longToast(menuIdText.toString() + "th menu is deleted")
    }
}
To test it out, I added 3 new item with the add button. Remember, you cannot delete a menu item if you don’t know the ‘itemId’.
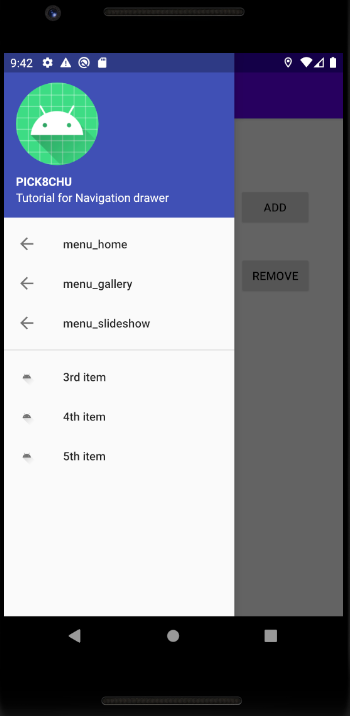
I’ll try to delete 4th item. Moment of the truth!
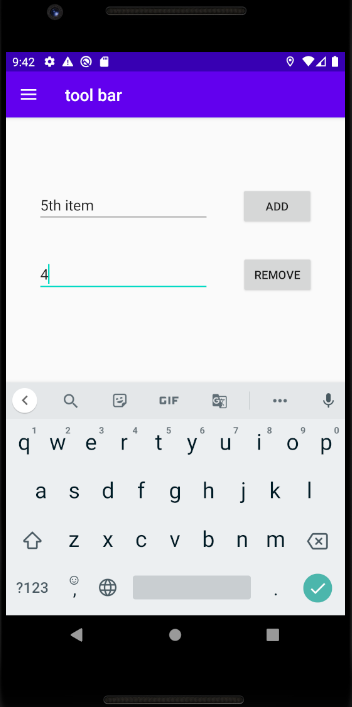
And there you go, glad it worked.
c. adding click event
You can also add click event dynamically. It’s gonna be looking like this.
        buttonAdd.setOnClickListener {
            var mMenu = navView.menu
            var menuSize = mMenu.size()

            ...

            mMenu.getItem(menuSize).setOnMenuItemClickListener {
                //do something
                toast(it.title.toString() + " menu item is selected")

                // false : function of super will be run
                // true : this will substitude the super function.
                false
            }
        }
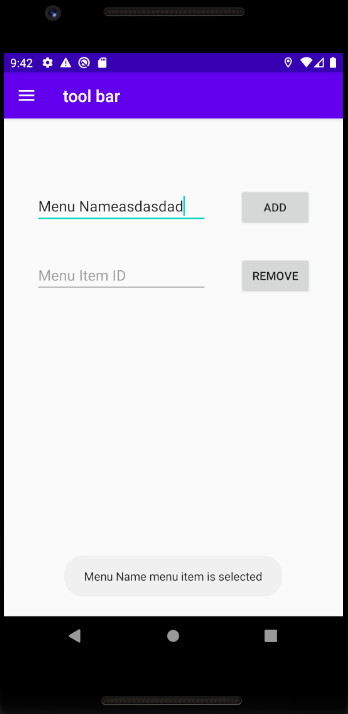
(Excuse the name of the menu, I’m little tired haha)
3. Epilogue
I hope all these were somewhat helpful to you.
Those menu items that you added dynamically won’t be saved, if you want to save them, you will have to use some kind of database like ‘SQLite’. I will try to cover this part later on, it’s quite simple.
It’s quite late already here, I’m done for today. Have a good day :)
Ah, here is the github repository of this project.