#. Before started
How to set a marker on google map?
mMap = googleMap
mMap.addMarker(MarkerOptions().position(sydney).title("Marker in Sydney"))
This is a simple example of setting a marker on google map.
- addMarker: Adding a marker with the option.
- MarkerOption: Settings for the marker.
Simply say, ‘addMarker’ function get parameter of <MarkerOption> type, and return <Marker>. In marker option, you could set things such as position, title, or snippet(body).
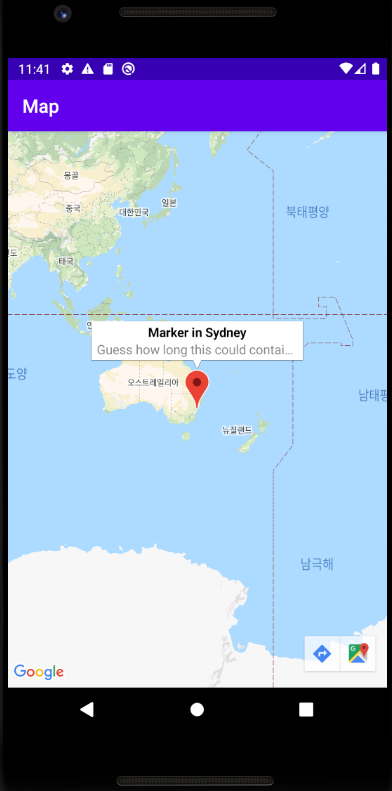
Example
If you run this code, you’ll get the following result;
override fun onMapReady(googleMap: GoogleMap) {
    mMap = googleMap

    // Add a marker in Sydney and move the camera
    val sydney = LatLng(-34.0, 151.0)
    mMap.addMarker(
        MarkerOptions()
        .position(sydney)
        .title("Marker in Sydney")
        .snippet("Guess how long this could contain?\n" +
                 "Maybe just one row?"))
    mMap.moveCamera(CameraUpdateFactory.newLatLng(sydney))
}
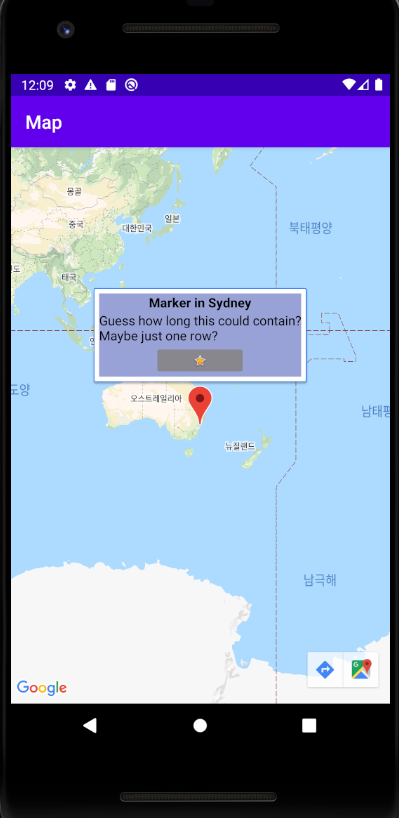
1. Adding a layout of info window
As you can see, default info window can’t contain many lines in its snippet. That was my main reason of making a custom one, but you may have your own reasons.
Making a layout
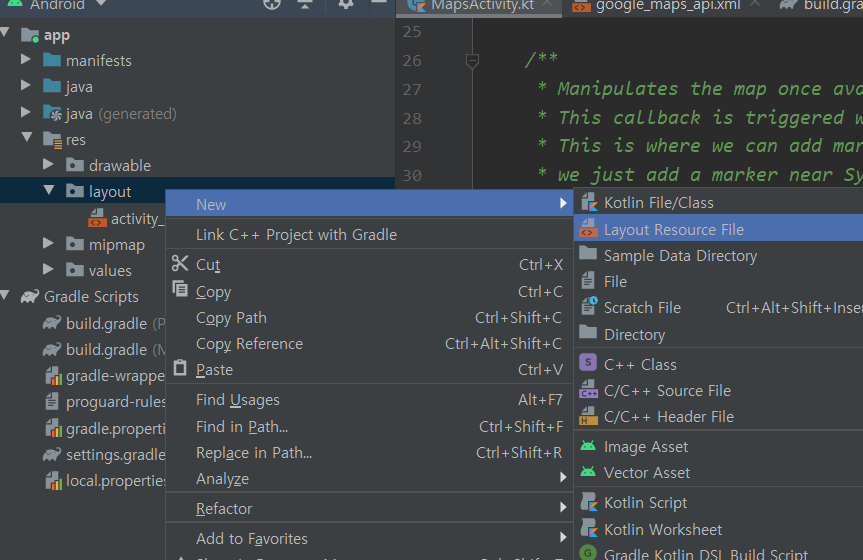
Make a layout in ‘res\layout’. Name it as you wish.
<?xml version="1.0" encoding="utf-8"?>
<LinearLayout xmlns:android="http://schemas.android.com/apk/res/android"
    android:layout_width="match_parent"
    android:layout_height="match_parent"
    xmlns:app="http://schemas.android.com/apk/res-auto"
    android:background="@drawable/common_google_signin_btn_icon_dark_normal_background"
    android:orientation="horizontal"
    android:padding="10dp">

    <LinearLayout
        android:layout_width="match_parent"
        android:layout_height="wrap_content"
        android:background="#99A2D6"
        android:orientation="vertical">

        <TextView
            android:id="@+id/title"
            android:layout_width="wrap_content"
            android:layout_height="wrap_content"
            android:layout_gravity="center_horizontal"
            android:ellipsize="end"
            android:maxLines="1"
            android:textColor="#000"
            android:textSize="14sp"
            android:textStyle="bold" />

        <TextView
            android:id="@+id/snippet"
            android:layout_width="wrap_content"
            android:layout_height="wrap_content"
            android:ellipsize="end"
            android:maxLines="10"
            android:textColor="#000"
            android:textSize="14sp" />

        <ImageButton
            android:id="@+id/infoWindowButton"
            style="@style/Widget.AppCompat.ImageButton"
            android:layout_width="100dp"
            android:layout_height="35dp"
            android:layout_gravity="center_horizontal"
            android:alpha="0.9"
            android:backgroundTint="#858585"
            android:clickable="true"
            android:elevation="30dp"
            android:scaleType="fitCenter"
            android:src="@android:drawable/btn_star_big_on" />
    </LinearLayout>


</LinearLayout>
This is the code for my new layout.
2. Adding a service to render it
Now you have to add a service to render the layout you just made, and to do that, you will have to implement ‘GoogleMap.InfoWindowAdapter’.
class CustomInfoWindowForGoogleMap(context: Context) : GoogleMap.InfoWindowAdapter {

    var mContext = context
    var mWindow = (context as Activity).layoutInflater.inflate(R.layout.custom_info_window, null)

    private fun rendowWindowText(marker: Marker, view: View){

        val tvTitle = view.findViewById<TextView>(R.id.title)
        val tvSnippet = view.findViewById<TextView>(R.id.snippet)

        tvTitle.text = marker.title
        tvSnippet.text = marker.snippet

    }

    override fun getInfoContents(marker: Marker): View {
        rendowWindowText(marker, mWindow)
        return mWindow
    }

    override fun getInfoWindow(marker: Marker): View? {
        rendowWindowText(marker, mWindow)
        return mWindow
    }
}
As you can see, with variable ‘mWindow’, you call the layout. after that, you will render title and snippet for the info window in ‘renderText’ function. And on override functions, you will call them.
3. Call it in onMapReady, and see if it works
override fun onMapReady(googleMap: GoogleMap) {
    mMap = googleMap

	...

    mMap.setInfoWindowAdapter(CustomInfoWindowForGoogleMap(this))
}
Using ‘setInfoWindowAdapter’, put in the class we just made.